Sunday, 2 December 2018

Pilih Pay Per Click atau Pay Per Download ? Mana yang paling menguntungkan?

Pay per Click (PPC) atau Pay per Download (PPD)?
untuk memilih mana yang paling menguntungkan dan berpengaruh, bagaimana kalau di coba kedua-duanya? yang penting situs tersebut tidak tipu-tipu atau scam yang kita udah capek-capek menghanbiskan kuota buat upload dan download eeeh, tidak dibayar.

1. ADF.com
ini ada salah satu referensi website PPC untuk kamu yang mau manfaatkan waktu kamu untuk menabung earning dengan click dan memperpendek url.
kamu bisa langsung daftar di situ ==> ADf.com


2. Uploadboy.com
untuk uploadboy ini adalah salah satu referensi website PPD , dimana cara kerjanya kamu upload file yang kamu miliki , hasil karya kamu atau apaun yang bermanfaat kemudian kamu sebarkan linknya untuk memudahkan teman-teman kamu mendownloadnya.
kamu bisa mulai mendaftar di bawah ini.
                                                    ||
                                                    ||
                                                   \/
Daftar UploadBoy(pay per Download) atau kesini

untuk pembayarannya kamu bisa pakai Paypal.
kenapa? karena paypal sudah banyak digunakan untuk transaksi digital jadi aman dan dapat di kirim ke bank local kita.
Selamat mencoba dan semoga bermanfaat :)
Continue reading Pilih Pay Per Click atau Pay Per Download ? Mana yang paling menguntungkan?

[part 1]NGINTIPS STRUKTUR ASP.NET MVC

Actually this article publish because anthusiast me for VB.net and i have ask to google about curiosity.

1. File -> New Project

Installing the software

This tutorial will begin by creating a new ASP.NET MVC 3 project using the free Visual Web Developer 2010 Express (which is free), and then we’ll incrementally add features to create a complete functioning application. Along the way, we’ll cover database access, form posting scenarios, data validation, using master pages for consistent page layout, using AJAX for page updates and validation, user login, and more.
You can follow along step by step, or you can download the completed application from http://mvcmusicstore.codeplex.com.
You can use either Visual Studio 2010 SP1 or Visual Web Developer 2010 Express SP1 (a free version of Visual Studio 2010) to build the application. We’ll be using the SQL Server Compact (also free) to host the database. Before you start, make sure you've installed the prerequisites listed below. You can install all of them using the following Web Platform Installer link: http://www.microsoft.com/web/handlers/webpi.ashx?command=getinstallerredirect&appid=VWD2010SP1Pack
Note: You can find this link on the big green button at this (easier to remember) link: http://asp.net/mvc


The Web Platform Installer will check what you’ve got installed and just download what you need.

If you want to individually install the prerequisites using the following links instead of using the above link, use the following links (written out in case you’re using a printed version of this tutorial):
Note: If you're using Visual Studio 2010 instead of Visual Web Developer 2010, install the prerequisites with this link instead:
Visual Studio Web Developer Express SP1 prerequisites http://www.microsoft.com/web/handlers/webpi.ashx?command=getinstallerredirect&appsxml=&appid=VS2010SP1Pack
I highly recommend you use the first Web Platform Installer link, as it will make sure you’ve got everything set up correctly.

Creating a new ASP.NET MVC 3 project

We’ll start by selecting “New Project” from the File menu in Visual Web Developer. This brings up the New Project dialog.

We’ll select the Visual C# -> Web Templates group on the left, then choose the “ASP.NET MVC 3 Web Application” template in the center column. Name your project MvcMusicStore and press the OK button.

This will display a secondary dialog which allows us to make some MVC specific settings for our project. Select the following:
Project Template - select Empty
View Engine - select Razor
Use HTML5 semantic markup - checked
Verify that your settings are as shown below, then press the OK button.

This will create our project. Let’s take a look at the folders that have been added to our application in the Solution Explorer on the right side.

The Empty MVC 3 template isn’t completely empty – it adds a basic folder structure:

ASP.NET MVC makes use of some basic naming conventions for folder names:
Folder Purpose
/Controllers Controllers respond to input from the browser, decide what to do with it, and return response to the user.
/Views Views hold our UI templates
/Models Models hold and manipulate data
/Content This folder holds our images, CSS, and any other static content
/Scripts This folder holds our JavaScript files
These folders are included even in an Empty ASP.NET MVC application because the ASP.NET MVC framework by default uses a “convention over configuration” approach and makes some default assumptions based on folder naming conventions. For instance, controllers look for views in the Views folder by default without you having to explicitly specify this in your code. Sticking with the default conventions reduces the amount of code you need to write, and can also make it easier for other developers to understand your project. We’ll explain these conventions more as we build our application.


Continue reading [part 1]NGINTIPS STRUKTUR ASP.NET MVC

Saturday, 1 December 2018

Menambahkan Widget Instagram di Blogger atau Website

Sebenarnya Untuk menampilkan Widget Instagram di blog atau website sangatlah mudah, ada beberapa website yang menyediakan script codenya seperti:  www.instawidget.netwww.snapwidget.comwww.lightwidget.com dan masih banyak lagi.
untuk yang saya gunakan ini adalah instawidget.net. yuuk, langsung saja masuk ke TKP. :)
Jadi pastikan Internet kamu tersambung ya , hehe

1.    Langkah 1 : Setelah masuk ke http://instawidget.net/, kemudian isi Username dengan nama akun instagram kamu, lalu akan tampil akun kamu di sampingnya.

2.    Langkah 2
Kemudian scrool/ tarik halaman website tersebut kebawah, lalu  klik “Preview” maka akun instagram dan foto-foto yang ada di instagram kamu akan tampil di bagian sampingnya.

3.    Langkah 3
Kemudian Klik “Get The embeded Code”, setelah itu maka akan tampil seperti gambar dibawah ini. Klik saja pada kotak yang berwarna biru, lalu tekan ctrl+c (untuk copy teks tersebut).

Dan, selesai deh,
“<!-- InstaWidget -->
<a href="https://instawidget.net/v/user/nurhayatitris" id="link-c8679a91f6cb795f779c9b9e74aeb760a0b6c815a89fd970320adcaeaf81ed05">@nurhayatitris</a>
<script src="https://instawidget.net/js/instawidget.js?u=c8679a91f6cb795f779c9b9e74aeb760a0b6c815a89fd970320adcaeaf81ed05&width=300px"></script>”
4.    Langkah 4
Untuk menambahkan ke halaman blog kamu, maka pilih menu “Layout”, samping kanan klik “+Add a Gadget”, lalu pilih “HTML/JavaScript”,

5.    Langkah 5
lalu Isi Title dengan Instagram kamu dan Content dengan code yang telah kamu copy tadi (Langkah 3), Misal :
Title : “Jangan Follow Instagram @nurhayatitris”
Content : “<!-- InstaWidget -->
<a href="https://instawidget.net/v/user/nurhayatitris" id="link-c8679a91f6cb795f779c9b9e74aeb760a0b6c815a89fd970320adcaeaf81ed05">@nurhayatitris</a>
<script src="https://instawidget.net/js/instawidget.js?u=c8679a91f6cb795f779c9b9e74aeb760a0b6c815a89fd970320adcaeaf81ed05&width=300px"></script>

Lalu Klik “Save”

6.       Langkah 6
Lalu Klik “Save arrangement”, dan klik “Preview”.

And then you can see your account Instagram at your blog, Like my blog, J

Horeeeeeeeeeee….. BERHASIL :)  semoga bermanfaat dan selamat Mencoba J

Continue reading Menambahkan Widget Instagram di Blogger atau Website

Sunday, 28 October 2018

Perintah kernel SVM menggunakan phyton

ini rangkuman yang saya buat karena sedang penasaran dengan SVM dalam perumusan konsepnya di phyton.
JADI di bawah ini saya mencoba menggunakan kernel linear untuk klasifikasi,
setiap "#ln[x]" saya running untuk melihat hasilnya dan apakah error atau tidak
# coding: utf-8

# In[3]:


#PRELIMINARIES(PERSIAPAN)
#import package to visualize the classifer
from matplotlib.colors import ListedColormap
import matplotlib.pyplot as plt
import warnings


# In[2]:


#import package to do the classifying
import numpy as np
from sklearn.svm import SVC


# In[4]:


#CREATE FUNCTION TO VISUALIZE CLASSIFICATION REGIONS
def versiontuple(v):
    return tuple(map(int, (v.split("."))))


# In[6]:


def plot_decision_regions(X, y, classifier, test_idx=None, resolution=0.02):
 
    #setup marker generator and color map
    markers = ('s', 'x', 'o', '^')
    colors = ('red', 'blue', 'lightgreen', 'gray', 'cyan')
    cmap = ListedColormap(colors[:len(np.unique(y))])
 
    #plot the decision surface
    x1_min, x1_max = X[:, 0].min() - 1, X[:, 0].max() +1
    x2_min, x2_max = X[:, 1].min() - 1, X[:, 1].max() +1
    xx1, xx2 = np.meshgrid(np.arange(x1_min, x1_max, resolution),
                          np.arrange(x2_min, x2_max, resolution))
    Z = classifier.predict(np.array([xx1.ravel(), xx2.ravel()]).T)
    Z = Z.reshape(xx1.shape)
    plt.contourf(xxx1, xx2, Z, alpha=0.4, cmap=cmap)
    plt.xlim(xx1.min(), xx1.max())
    plt.ylim(xx2.min(), xx2.max())
 
    for idx, cl in enumerate(np.unique(y)):
        plt.scatter(x=X[y == c1, 0], y=X[y == c1, 1],
                   alpha=0.8, c=cmap(idx),
                   marker=markers[idx], label=c1)
     
    #highlight test samples
    if test_idx:
        #plot all samples
        if not versiontuple(np.__version__) >= versiontuple('1.9.0'):
            X_test, y_test = X[list(test_idx), :], y[list(test_idx)]
            warnings.warn('Please update to Numpy 1.9.0 or newer')
        else:
            X_test, y_test = X[test_idx, :], y[test_idx]
         
        plt.scatter(X_test[:, 0],
                    X_test[:, 1],
                    c='',
                   alpha=1.0,
                   linewidths=1,
                   marker='o',
                   s=55, label='test set')


# In[9]:


#GENERATE DATA
np.random.seed(0)
X_xor = np.random.randn(200, 2)
y_xor = np.logical_xor(X_xor[:, 0] > 0,
                       X_xor[:, 1] > 0)
y_xor = np.where(y_xor, 1, -1)

plt.scatter(X_xor[y_xor == 1, 0],
            X_xor[y_xor == 1, 0],
            c='b', marker='x',
           label='1')
plt.scatter(X_xor[y_xor == -1, 0],
           X_xor[y_xor == -1, 1],
           c='r',
           marker='s',
           label='-1')

plt.xlim([-3, 3])
plt.ylim([-3, 3])
plt.legend(loc='best')
plt.tight_layout()
 
#indentation error = itu artinya minta di tab atau kalimat tersebut harus agak menjorok dari atasnya
#Kalau unvalid syntaxm bisa jadi kamu salah ketik atau ada perintah yang belum ditulis. plt.show()


# In[27]:


#CLASSIFY USING A LINEAR KERNEL
#Create a SVC classifier using a linear kernel
#kata "rbf" di bawah ini bisa diganti dengan macam-macam kernel SVM
svm = SVC(kernel='linear', C=1, random_state=0)
#Train the classifier
svm.fit(X_xor, y_xor)

#Visualize the decision boundaries
plot_decision_regions(X_xor, y_xor, classifier=svm)
plt.legend(loc='upper left')
plt.tight_layout()
plt.show()


ref: Chrisalbon.com


Continue reading Perintah kernel SVM menggunakan phyton

Friday, 26 October 2018

LANGKAH METODE SMOTE

1. Mengumpulkan sample minority
2. Mencari mminimal 2 tetangga (k-2)
3. Memasukkan ke rumus euclidiance (mencari jarak tetangga)
4. Membuat data synthetic: mengalikan data array (A11 X A12 (data atasnya dan data bawahnya atau data atasnya dengan data kedua di bawahnya))
5. Menggabungkan dengan data sythetic tersebut dengan data minority asli.
6. Menyeimbangkan dengan data mayority
Jika data minority 5 maka data mayority 15 maka, untuk menyeimbangkan data syntetic harus 15 juga, jadi 2X lipat data minority, sehingga presentase data synthetic (SMOTE) adalah 200%.
Continue reading LANGKAH METODE SMOTE

Tuesday, 23 October 2018

Error saat import tabel excel ke Mysql

Cara eksekusi file Excel yang malah jadi satu kolom di fieldnya Mysql, itu:
Apakah kamu udah cek separate nya data tersebut belum? kalau tanda pemisah datanya menggunaan (,) bisa jadi tanda koma itu yang mengganggu.
karena di kasus saya yang ini sudah bolak - balik di import malah jadi satu kolom dan kolom yang lain berisi "0", :(,
lalu untuk mengakalinya saya copy data Excel tersebut ke word, kemudian setelah tampil data nya yang berbentuk tabel di word,
kemudian saya covert, dengan cara: blok dulu tabel yang ingin di convert, kemudian di menu layout (excel 2010) akan muncul menu "convert to text" di sebelah atas kanan. ganti pilihan other di kolomnya dengan tanda titik koma (;)
kemudian saya save as menjadi data Plain text (*.txt).
kemudian yang terakhir saya membuka folder tempat penyimpanannya *txt tadi dan merubah extension menjadi csv atau save as *.csv.


Continue reading Error saat import tabel excel ke Mysql

Wednesday, 17 October 2018

Link Download Arduino Langsung di Web Arduino Versi terbaru

Download IDE Arduino Untuk Membuat IOT

Klik Tulisan "JUST DOWNLOAD" pada halaman web tersebut


Buka folder dimana downloadan kamu.
Lalu klik Install , Klik Next -- next -- sampai muncul tampilan seperti dibawah ini, 
Kemudian tunggu Proses Instalasi sambil minum kopi sampai selesai
Jika nanti ada keluar peringatan untuk install com , maka klik OK


Continue reading Link Download Arduino Langsung di Web Arduino Versi terbaru

Monday, 19 March 2018

Install Package Control: Install Package dan Javatar untuk compile code JAVA DI SUBLIME TEXT 3

Hal yang harus kita lakukan adalah :
  1. Pastikan Sublime Text 3 sudah diinstall di laptop atau pc yang kita gunakan.
  2. Pastikan JDK (Java Development Kit) sudah terinstall pula.
  3. Dan pastikan juga anda terkoneksi dengan internet.
  4. Install Package Control Sublime text 3. caranya silahkan buka link Manual To Installation ini 
  5. Selanjutnya sekarang kita buka sublime text 3.
  6. Jika sudah dibuka kita tekan ctrl+shift+p, akan muncul sebuah pop up lalu kita cari Package Control: Install Package lalu tekan enter 


Install 

Karena Javatar saya sudah terinstall jadi pop up menampilkan "Package has been update!"


Cara ngecek Javatar telah terinstall


Referensi : Install Javatar untuk compile source code Java console
Continue reading Install Package Control: Install Package dan Javatar untuk compile code JAVA DI SUBLIME TEXT 3

Saturday, 17 March 2018

mengakses / menjalankan Mysql / wampserver menggunakan cmd / console

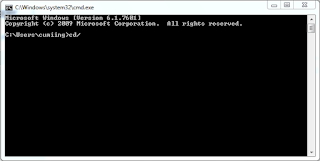
klik icon start windows di pojok kiri bawah, kemudian ketik cmd, kemudian tekan enter pada keyboard.

maka akan muncul tampilan layar hitam seperti dibawah ini. kemudian ketik cd:/ untuk masuk ke direktori c:\
 atau bisa juga dengan mengetikkan perintah: cd .. dua kali untuk menuju ke direktori c:\
kemudian setelah masuk ke direktori tersebut, ketikkan perintah pada gambar dibawah ini :
1. cd wamp
2. cd bin
3. cd mysql
4. cd mysql5.1.30
    untuk angka 5.1.30 ini sesuaikan dengan versi mysql yang kamu install :

5. cd bin
6. mysql -u root


Continue reading mengakses / menjalankan Mysql / wampserver menggunakan cmd / console